

Schedules
A big job can have dozens or hundreds of configured items, each with its own reference and location (“D01, Level 2, Plant room”). The Schedule tab shows them in a grid, one row per item, so you can fill in and check them the way you would in a spreadsheet.
The tab is next to Sale lines on any enquiry, quote or order that has an item on a schedule (or, if you can edit sales, whenever a schedule is linked to a family with products you can add). Its count is the number of items on a schedule. For adding and configuring the items themselves, see Configured items.
A grid for each schedule
Section titled “A grid for each schedule”Each product family can be linked to a schedule (see Schedules), and an item is on its family’s schedule. When a sale has items on more than one schedule, the tab has a sub-tab for each, named with its number of items, such as Unit schedule (20) and Rack schedule (4). Select one to see its grid. With items on only one schedule there are no sub-tabs.
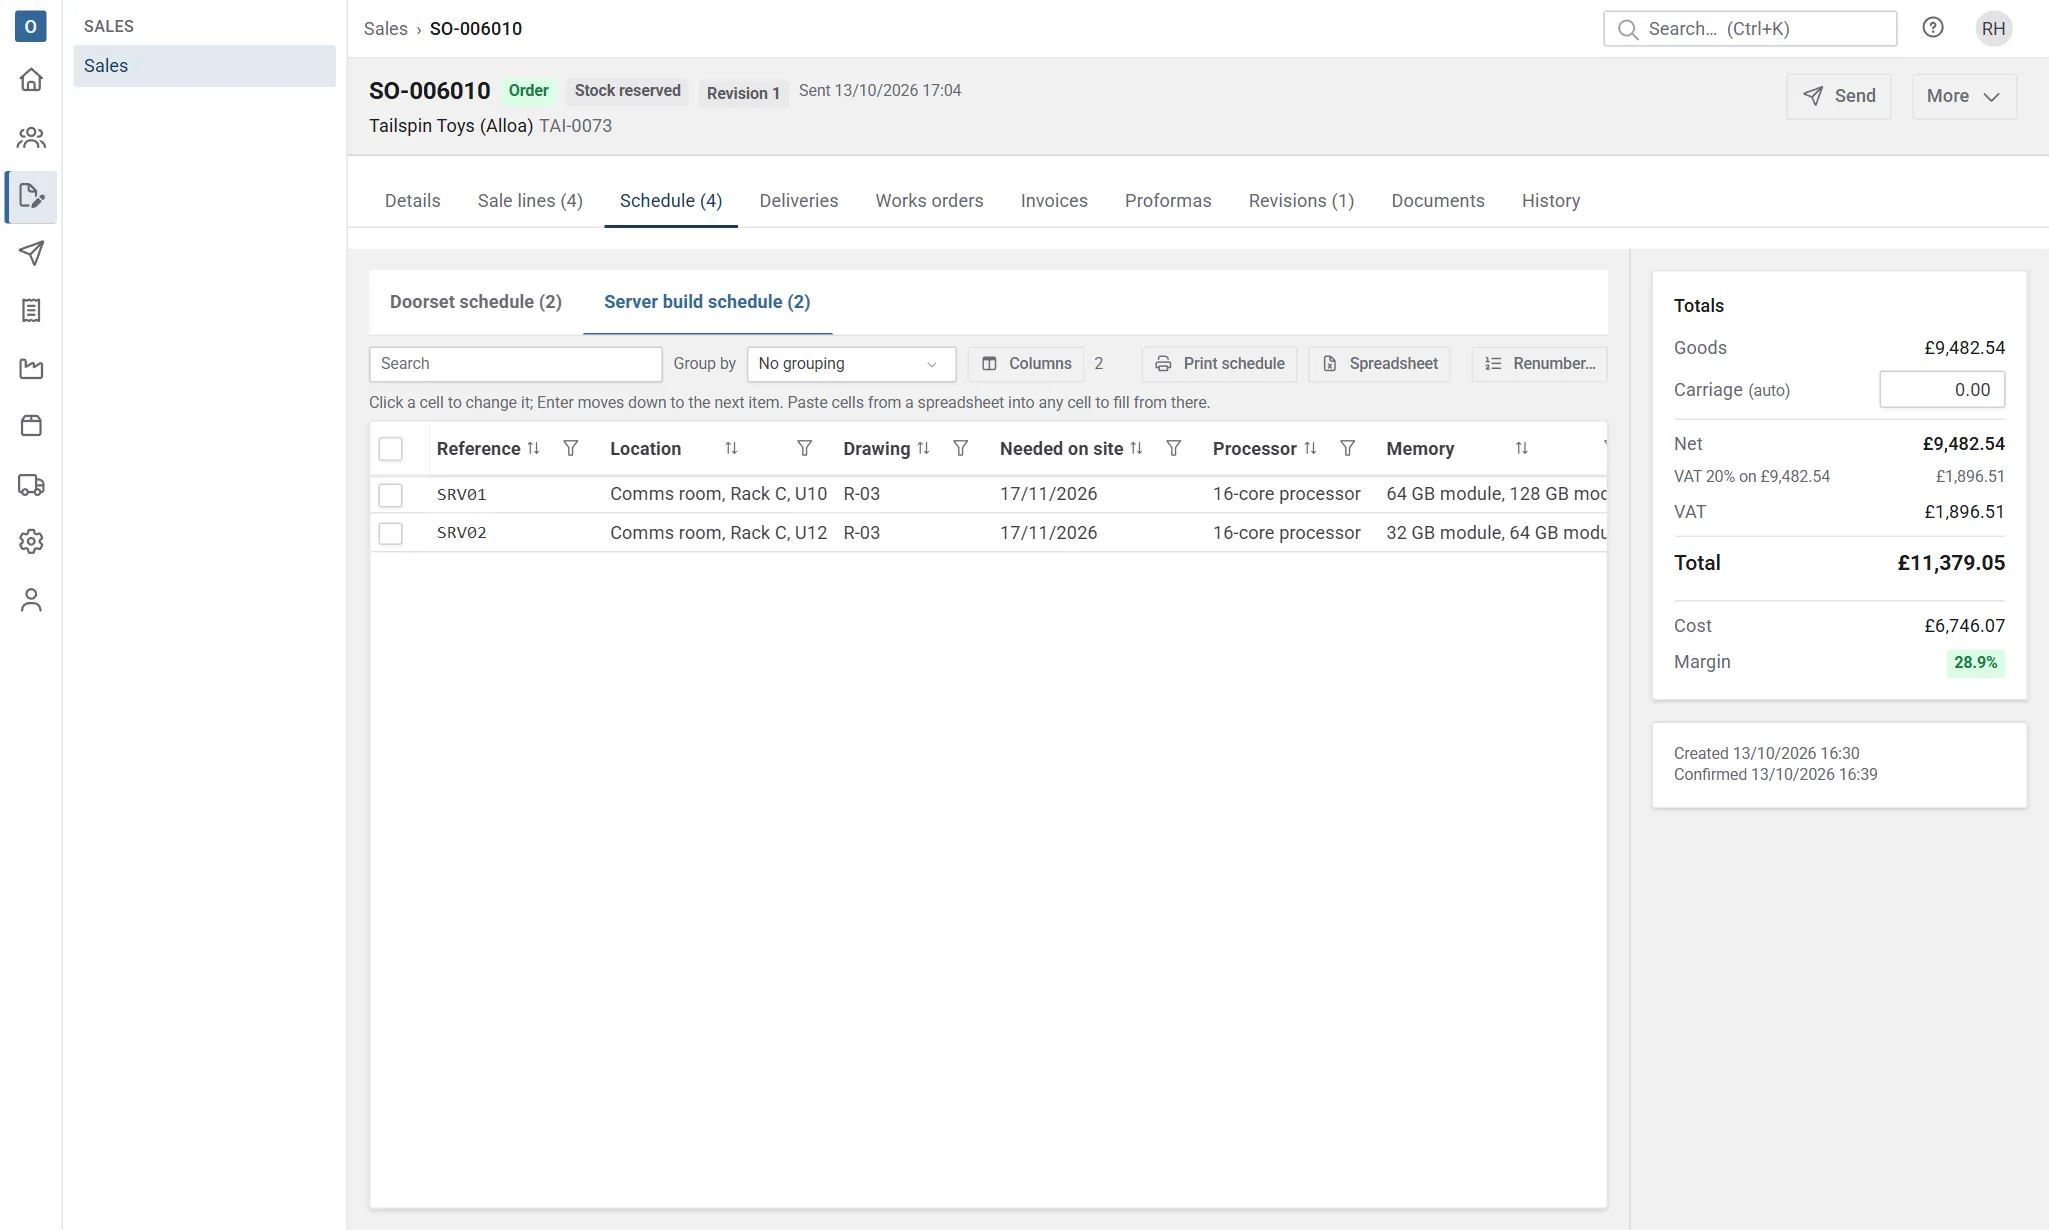
Each grid has its own columns, ticks, sorting, filters and grouping, and the actions on its toolbar only work on its own items. Switching between them keeps every change you’ve made: they’re all part of the sale’s unsaved changes until you select Save. The sub-tab you chose stays chosen while the sale is open.
If some configured items aren’t on any schedule, because their family isn’t linked to one, a note above the grid says how many (“3 configured items aren’t on a schedule, because their family has none.”). They’re still on the Sale lines tab. If you can manage the configurator, the note links to Products → Configurator → Schedules, where the family can be linked.
What’s in the grid
Section titled “What’s in the grid”Each row is one configured item, with:
- its Reference, and the fields of its schedule (set up in Products → Configurator → Schedules, see Schedules). Location is one of them: it comes first on the Standard schedule, and a schedule that doesn’t need it can leave it out;
- the schedule columns of its product family, such as a size or a finish (chosen on the family’s Details tab, see Configurable products). When a sale has items from more than one family, columns with the same name are shared, and a Family column tells them apart;
- its Description, Qty, Price and Net;
- the Version of the product it was built with. If a newer version has been published, the version shows in amber, and pointing at it says which is current;
- a lock when the item is on a delivery, invoice, proforma, purchase order or requisition. Pointing at it names the document (“On DEL-0040”);
- its Margin, if you can see costs.
The fields are the schedule’s own, in its order. If an item still has a value for a field that isn’t on its schedule (its family moved to another schedule, say, or the field was taken off), that column shows too, greyed: the value is kept but can’t be changed there, and it doesn’t print.
One row can stand for several identical items: a reference with a quantity of 4 is four of the same item. See Split to give each one its own reference.
Columns hides the columns you don’t need. Reference and description always show. Your choice is kept for you on this computer, for each schedule.
Edit in the grid
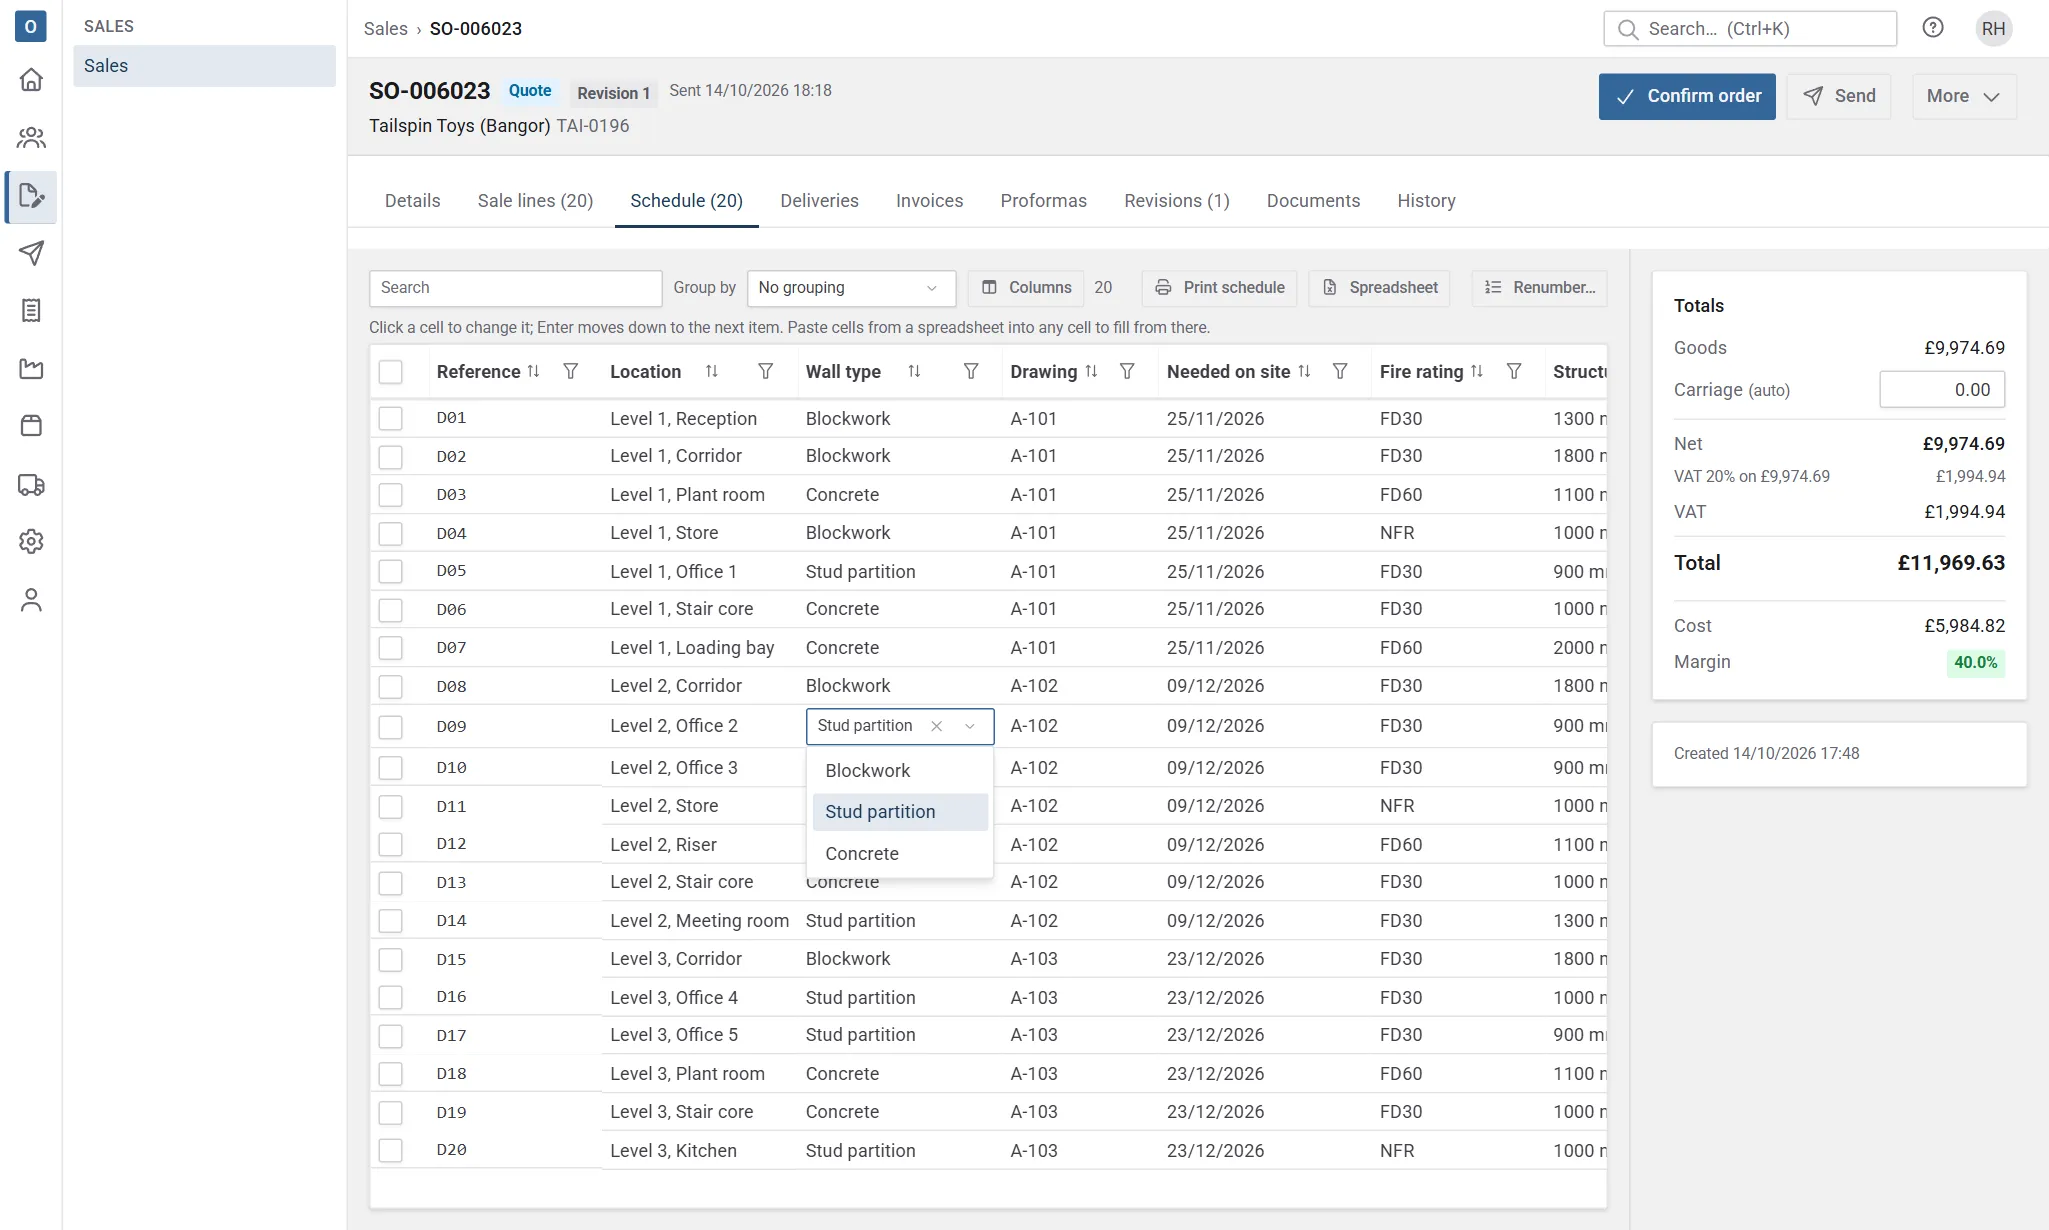
Section titled “Edit in the grid”The Reference, schedule field (such as Location) and Qty cells can be changed. Click one (or move to it with Tab, or press Enter on it) to open it for editing:
- Reference and text fields, such as Location, are a box to type in. Qty and number fields take numbers only, with the decimal places they allow.
- A choice or yes/no field is a list to pick from (select the cross to clear it). A date field takes a typed date, or select its calendar icon to pick one. Dates show in your company’s date format.
- Enter moves down to the same cell on the next item and opens it, as in a spreadsheet, onto the next page if need be (Shift+Enter moves up). In a reference, text, number or Qty box the up and down arrows do the same. In an open list of choices, Enter picks the highlighted one; with nothing highlighted it moves down.
- Tab moves to the next cell you can change. Esc, or clicking anywhere else, closes the cell and keeps what you typed.
- Paste from a spreadsheet: copy a block of cells in your spreadsheet, click the first cell to fill and paste. The cells fill down the rows and across the columns you can type in (reference, the fields, quantity), in the order they’re shown. A choice can be pasted by its name.
The description, price and the family’s columns come from each item’s configuration, so they can’t be typed here. To change them, select the … at the end of the row and choose Edit configuration.
Everything you change here is part of the same unsaved changes as the Sale lines tab: select Save to keep them or Discard to throw them away, and you’re asked before leaving with changes unsaved.
Sort, filter and group
Section titled “Sort, filter and group”These change only what you see, not the order of the sale’s lines (to keep an order, see Apply this order).
- Sort: select a column’s heading; select it again to reverse, and a third time to go back to the sale’s order. The arrows by the heading show which way it’s sorted. Numbers inside text sort as numbers, so D2 comes before D10 and 926 mm before 1,000 mm. Grouped, the items are sorted within each group.
- Search: type in the search box. It looks in every column, and every word must match.
- Filter a column: select the funnel by its heading, tick the values to show, then select Apply. The funnel’s Clear shows that column’s values again, and Clear filters above the grid clears the search and every column’s filter.
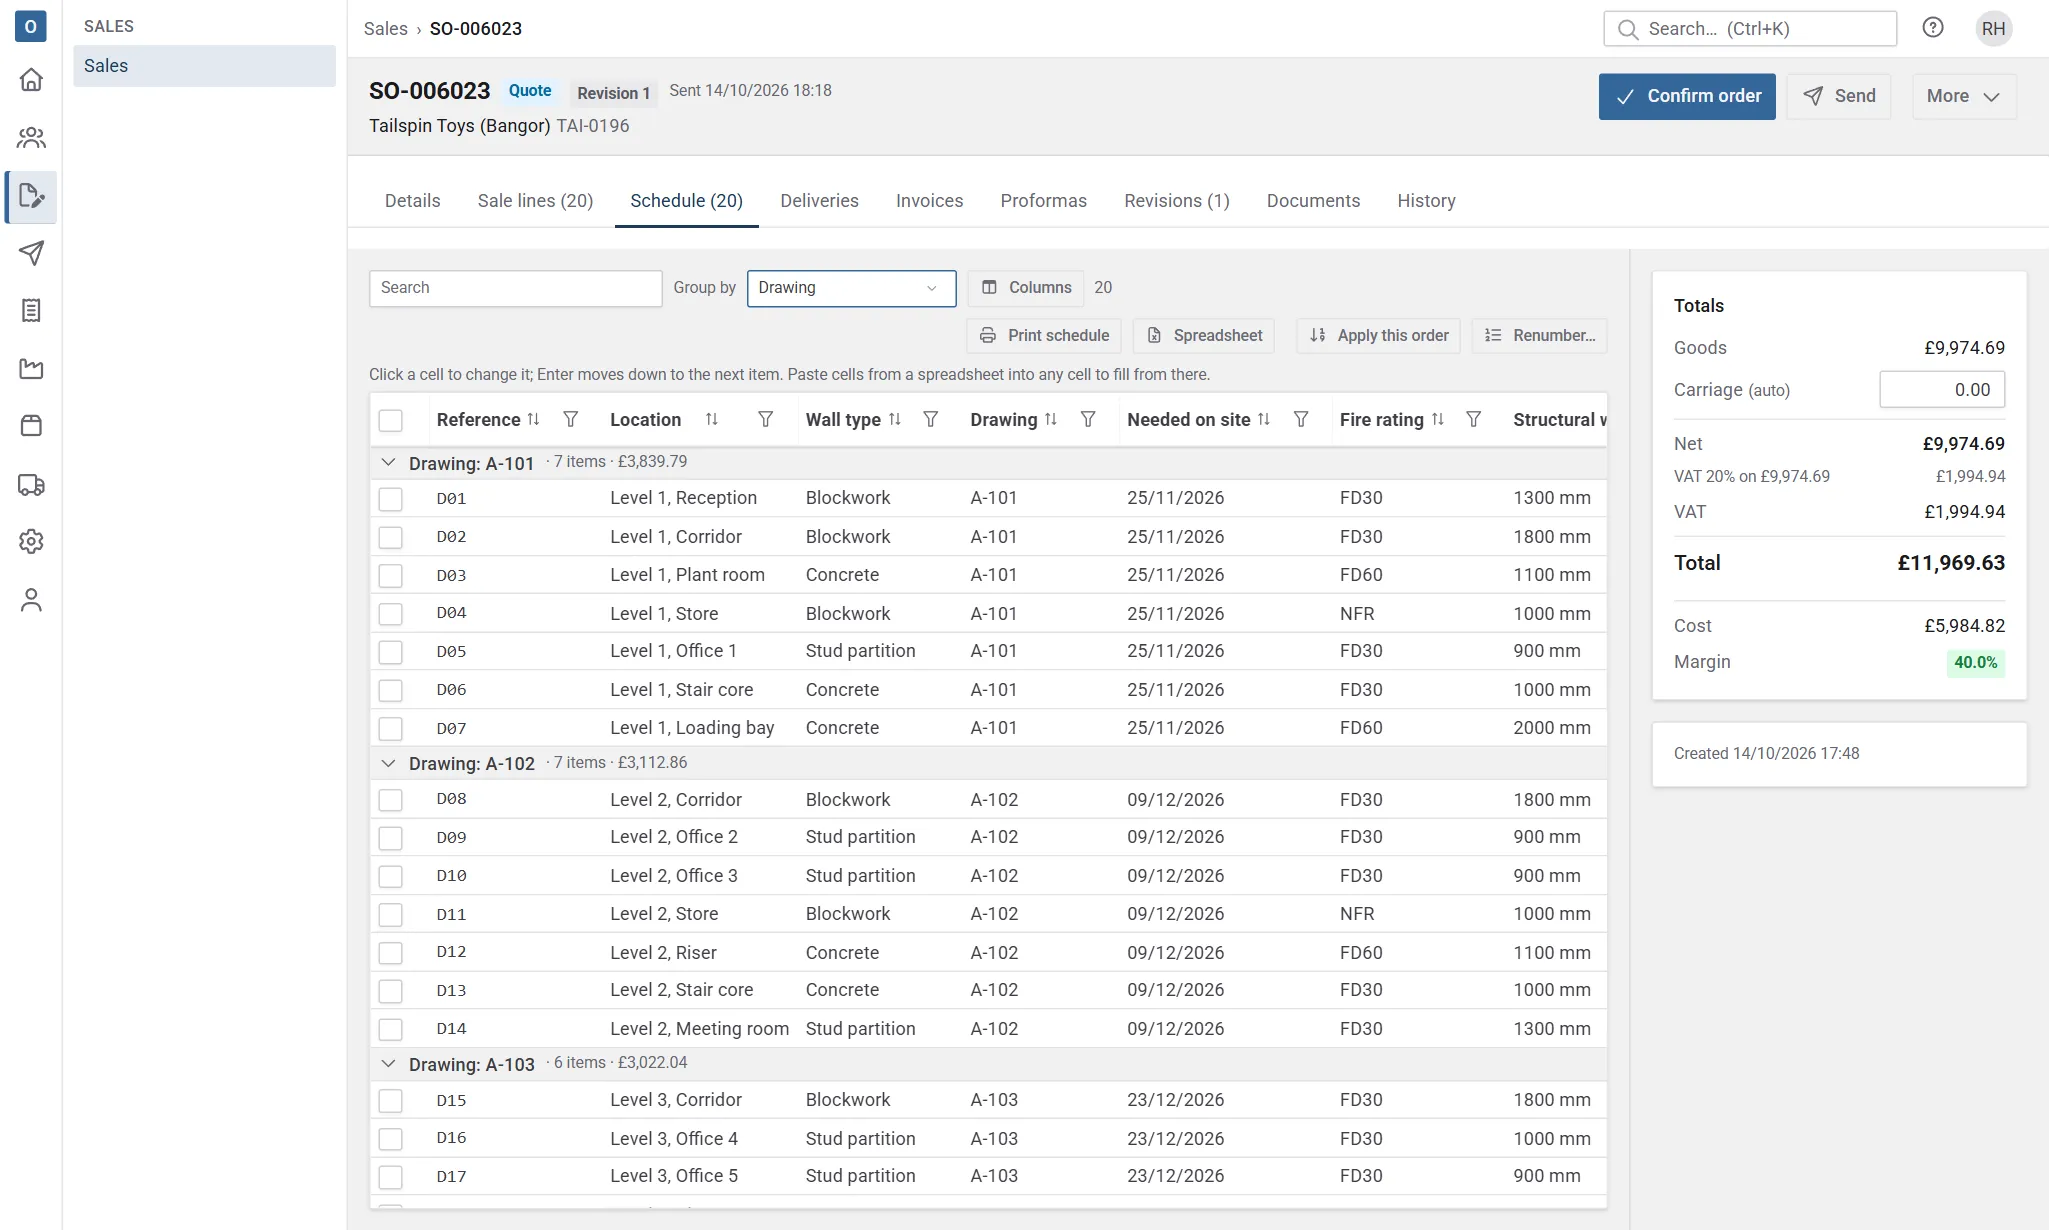
- Group: choose a column in Group by, such as Location. Each group has a heading with its number of items and their net total; select the heading to fold the group away.
Items stay where they are while you change them, even in a sorted or filtered column, so the one you’re typing in never jumps away. They’re sorted again when you sort or save, and filtered again when you filter, search or save. Copying, splitting or deleting items sorts and filters again too, keeping the page you’re on. Sorting goes back to the first page, and the search waits a moment after you stop typing.
Big schedules show 100 items a page, or 50 when more than 12 columns can be changed (so the page stays quick to draw). A group that carries on onto the next page starts that page with its heading again, marked continued. A folded group counts as one line, its heading, so folding big groups shortens the pages; unfolding it keeps the page you’re on.
Work with many items at once
Section titled “Work with many items at once”Tick the items to work on. Hold Shift as you tick to tick every item between that one and the last one you ticked. The box in the heading, or Tick all shown, ticks every item the search and filters leave, on every page. Ticks are for one schedule’s grid at a time.
The bar above the grid then offers:
| Action | What it does |
|---|---|
| Copy… | Asks how many copies of each ticked item to make (1 to 99, and up to 500 items in one go), and whether they keep the schedule fields. The copies go straight after the last ticked item, with the next free references. The sale is saved straight away, with any other changes you had. |
| Set for ticked… | Sets one of the schedule’s fields (such as the location) or the quantity on every ticked item. Leave a field empty to clear it. |
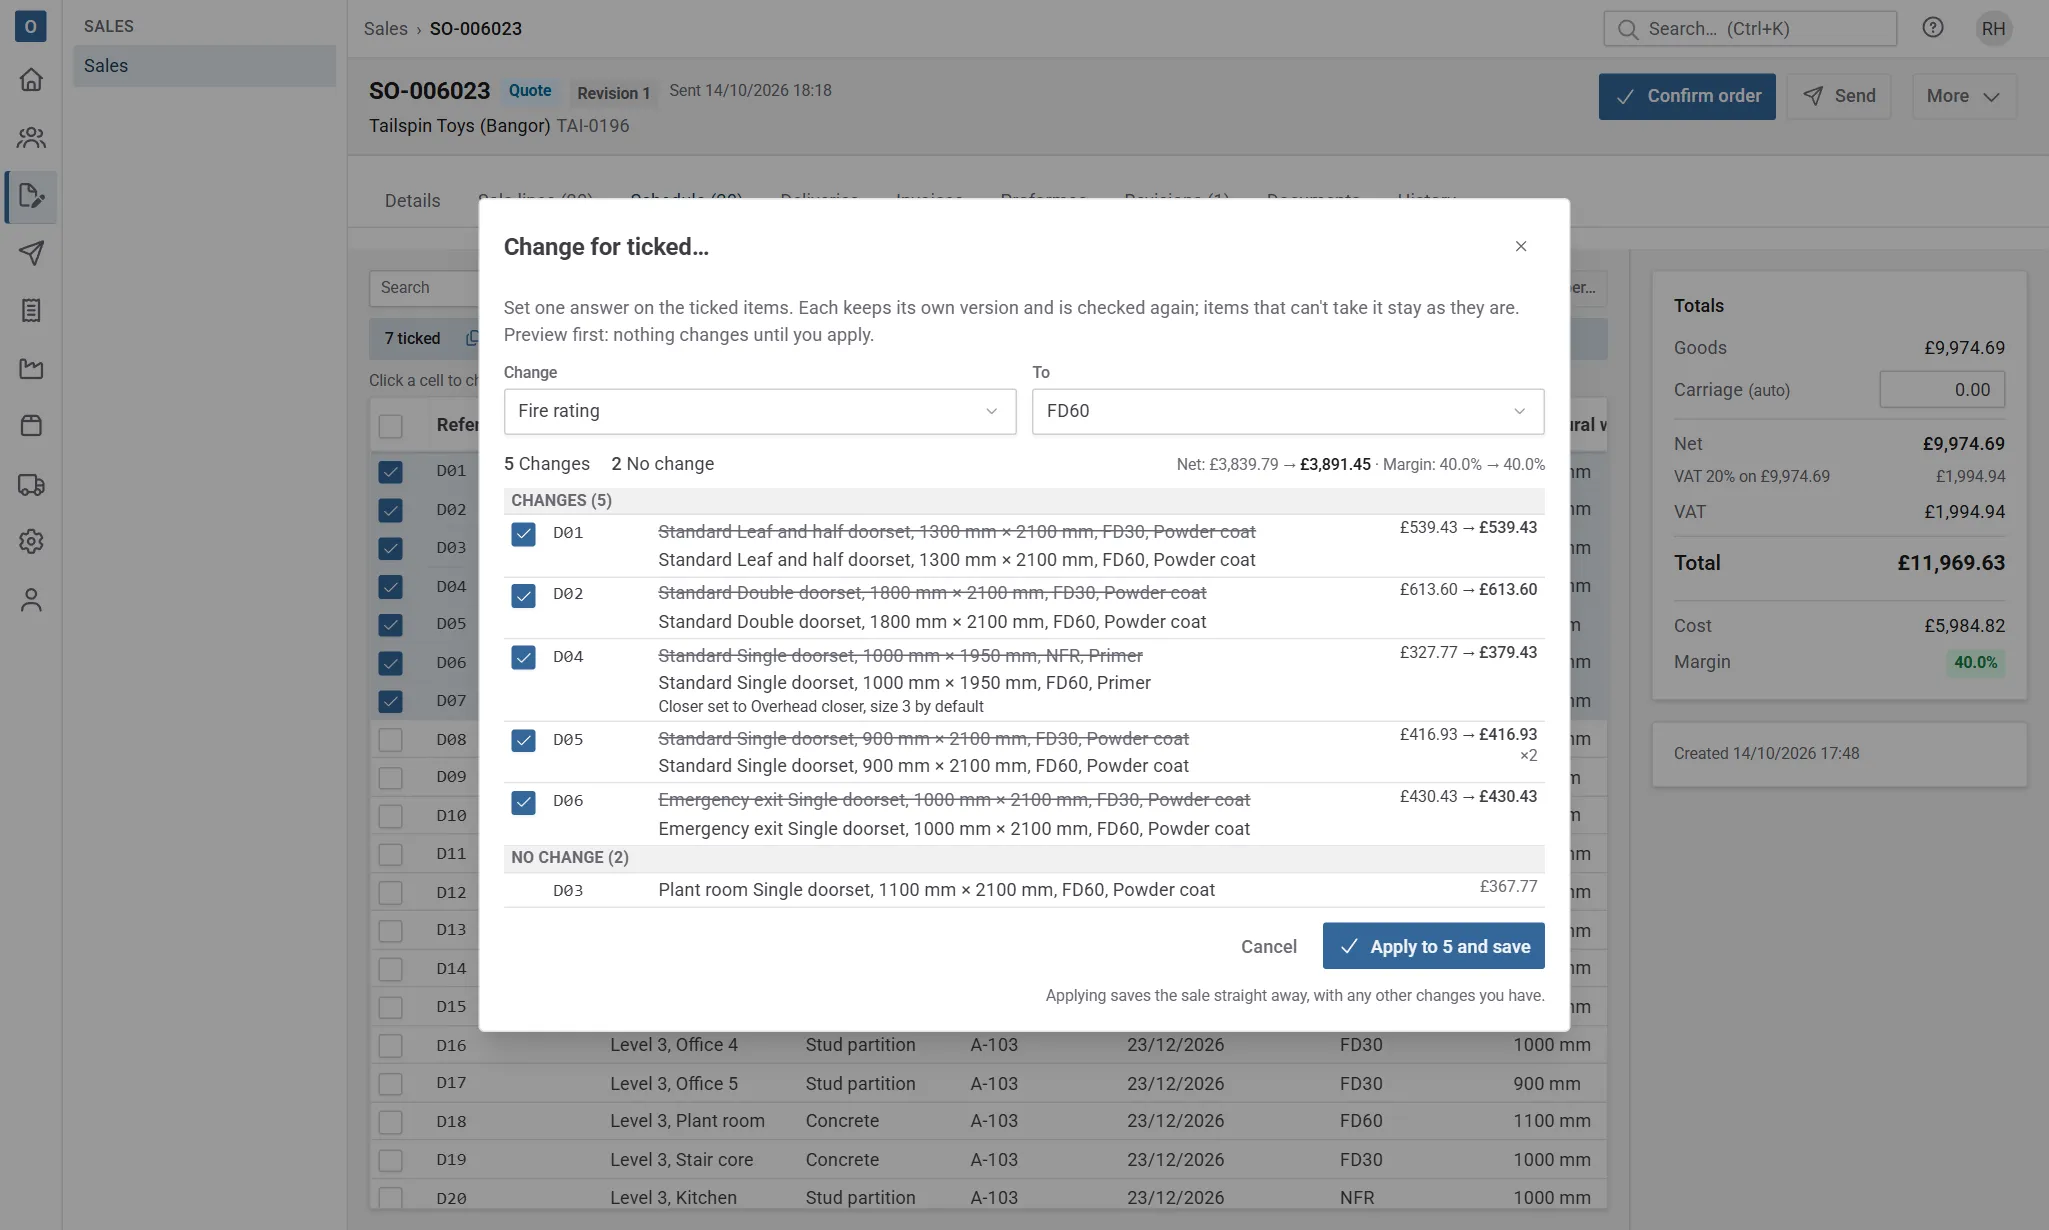
| Change for ticked… | Changes one answer of the ticked items’ configurations, such as a size or a finish, after showing you what it would do to each one. The sale is saved when you apply it. See Change for ticked. |
| Renumber… | Gives the ticked items (or every item on the schedule) new references, in the order the grid shows them. |
| Split | Splits each ticked item with a quantity of more than one into single items. |
| Delete | Removes the ticked items and their parts. |
Apart from Copy and Change for ticked, nothing is saved until you select Save.
Copies use the same answers as the item they copy, so they’re priced the same way. Each copy is a new item, so it’s built with the product’s current version and worked out again when the sale saves, at today’s costs. References carry on from the highest number already on the sale, in the style of the item copied: copying D01 seven times on a sale with D01 to D03 gives D04 to D10.
If a copy can’t be finished on the current version (an answer the item had isn’t available any more, say), the save is refused naming the line, and the copies stay on screen for you to fix with Edit configuration or remove.
Change for ticked
Section titled “Change for ticked”Change for ticked… sets one answer on many items at once: a different finish for every item on one floor, say.
-
Under Change, choose what to change. The list is grouped by product family and only has the families of the items you ticked. It offers the answers the items’ configuration asks for: a choice, a number (with its unit and the range it can take), yes or no, or text. Things that are worked out from other answers, or that take several answers at once, can’t be changed this way.
-
Under To, choose or type the new answer.
-
Select Preview. Nothing changes yet: the preview shows what would happen to each ticked item, grouped as:
- Changes: its description before and after, its price before and after, and anything else that changes with it because of the new answer (“Glazing removed: …”).
- No change: it already has that answer.
- Can’t change, with the reason: its version doesn’t have that answer (“Version 1 has no Anodised for Finish”), the new answer doesn’t go with its other answers, or its new price would be under its minimum margin and you can’t approve that.
- Skipped: it’s on a delivery, invoice, proforma, purchase order or requisition, or it’s from another family.
Above the list are the net totals before and after (and the margin, if you can see costs), how many changes have a typed price (a typed price stays as it is), and how many changes clear another answer, which are marked so you can check them.
-
Untick any change you don’t want, then select Apply to … and save. The changes go onto the items and the sale is saved straight away, with any other changes you had.
Each item keeps the version of the product it was built with, as it does when prices are refreshed. To give an item an answer only a newer version has, edit its configuration and move it to the current version first.
When you apply, the sale is worked out again as it is saved, exactly as if you’d changed each item yourself: prices, minimum margins and documents are all checked again. If anything has changed since the preview (someone else saved the sale, say), nothing is saved and the items stay as they were: preview again.
Items you’ve added or split but not saved yet are left out: save the sale first to include them. The preview prices items as the sale was saved, so if you’ve changed its currency or date without saving, it says so: save first for an exact preview.
Renumber
Section titled “Renumber”Choose the prefix and how many digits (the schedule’s, to start with), the number to start at, then whether to renumber the ticked items or every item on this schedule. Items are numbered in the order on screen (as sorted when you last sorted, and grouped), so sort or group first if you want a particular order. References are unique across the whole sale, so if a new reference is already used by any item you’re not renumbering, on this schedule or another, nothing changes and the references in the way are listed.
Apply this order
Section titled “Apply this order”When the grid is sorted or grouped, Apply this order puts the schedule’s items in the order on screen: as sorted when you last sorted, so a value you’ve changed since doesn’t move its item. Items a search or filter hides take their places in that order too. They swap places among themselves: headings, notes, ordinary lines and other schedules’ items stay where they are.
Split an item into single items
Section titled “Split an item into single items”Split (also in the row’s … menu) turns an item with a quantity of 4 into four items of 1. The first keeps its reference; the others get the next free references in its schedule’s numbering, and the same schedule fields.
Items on a document
Section titled “Items on a document”An item that’s on a delivery, invoice, proforma, purchase order or requisition is never offered for Delete or Split, and nor is any saved item while the schedule is still loading (or if it couldn’t load: select Try again). Removing such an item on the Sale lines tab is refused when you save, naming the item and the document. If you tick it with others, deleting leaves it out and says why (“D03 is on DEL-0040, so it stays”). Its reference and fields can still be changed.
Import and export a spreadsheet
Section titled “Import and export a spreadsheet”Spreadsheet on the Schedule tab sends the schedule to a spreadsheet and brings it back, so a schedule can be checked, filled in or sent on in Excel. Anyone who can see the sale can export; importing needs permission to edit sales.
A workbook has a sheet for each schedule, named after it, with a row for each item on that schedule. On a sale with more than one schedule, the Spreadsheet menu on each sub-tab is for that sub-tab’s schedule.
Export
Section titled “Export”- Export to Excel downloads a workbook with the sub-tab’s schedule on a sheet of its own, and a row for each item. Row 1 has the headings and row 2 the keys the import uses to match the columns: leave row 2 as it is, even if you rename or move columns.
- Export all schedules (offered when the sale has more than one) downloads one workbook with a sheet for each schedule.
- The columns are Reference, the schedule’s fields in its order (on the Standard schedule, Location first), a grey Family, Product code, Quantity, then the attributes that can be answered of each family on the schedule (each family’s schedule columns first), Description, Unit price and Net for reference, and a grey Item ID that tells the import which item each row is. Leave the Item ID as it is. Choices are written by name, yes/no as Yes or No, numbers as numbers and dates as dates.
- Family says which product family each row’s item is from. It’s there for reference: the import doesn’t read it.
- When a schedule has more than one family, their attributes share a column when they have the same name (two families’ Fire rating, say); every other attribute has a column of its own. A cell is blank where the row’s family doesn’t have that column’s attribute. A shared column whose attributes are of different kinds (a number for one family, a choice for another) is formatted as text.
- Export CSV downloads the same columns for the sub-tab’s schedule as a CSV file, without the row of keys, for other software. A cell starting with
=,+,-or@gets an apostrophe in front, so a spreadsheet can’t run it as a formula. - Fields that aren’t on the schedule aren’t exported, even if an item still has a value for one.
- Costs and margins are never in an export.
- An export is of what’s saved. If you have unsaved changes, you’re asked first.
Import
Section titled “Import”- Save your changes: an import works on the saved sale, so Import… asks you to save first.
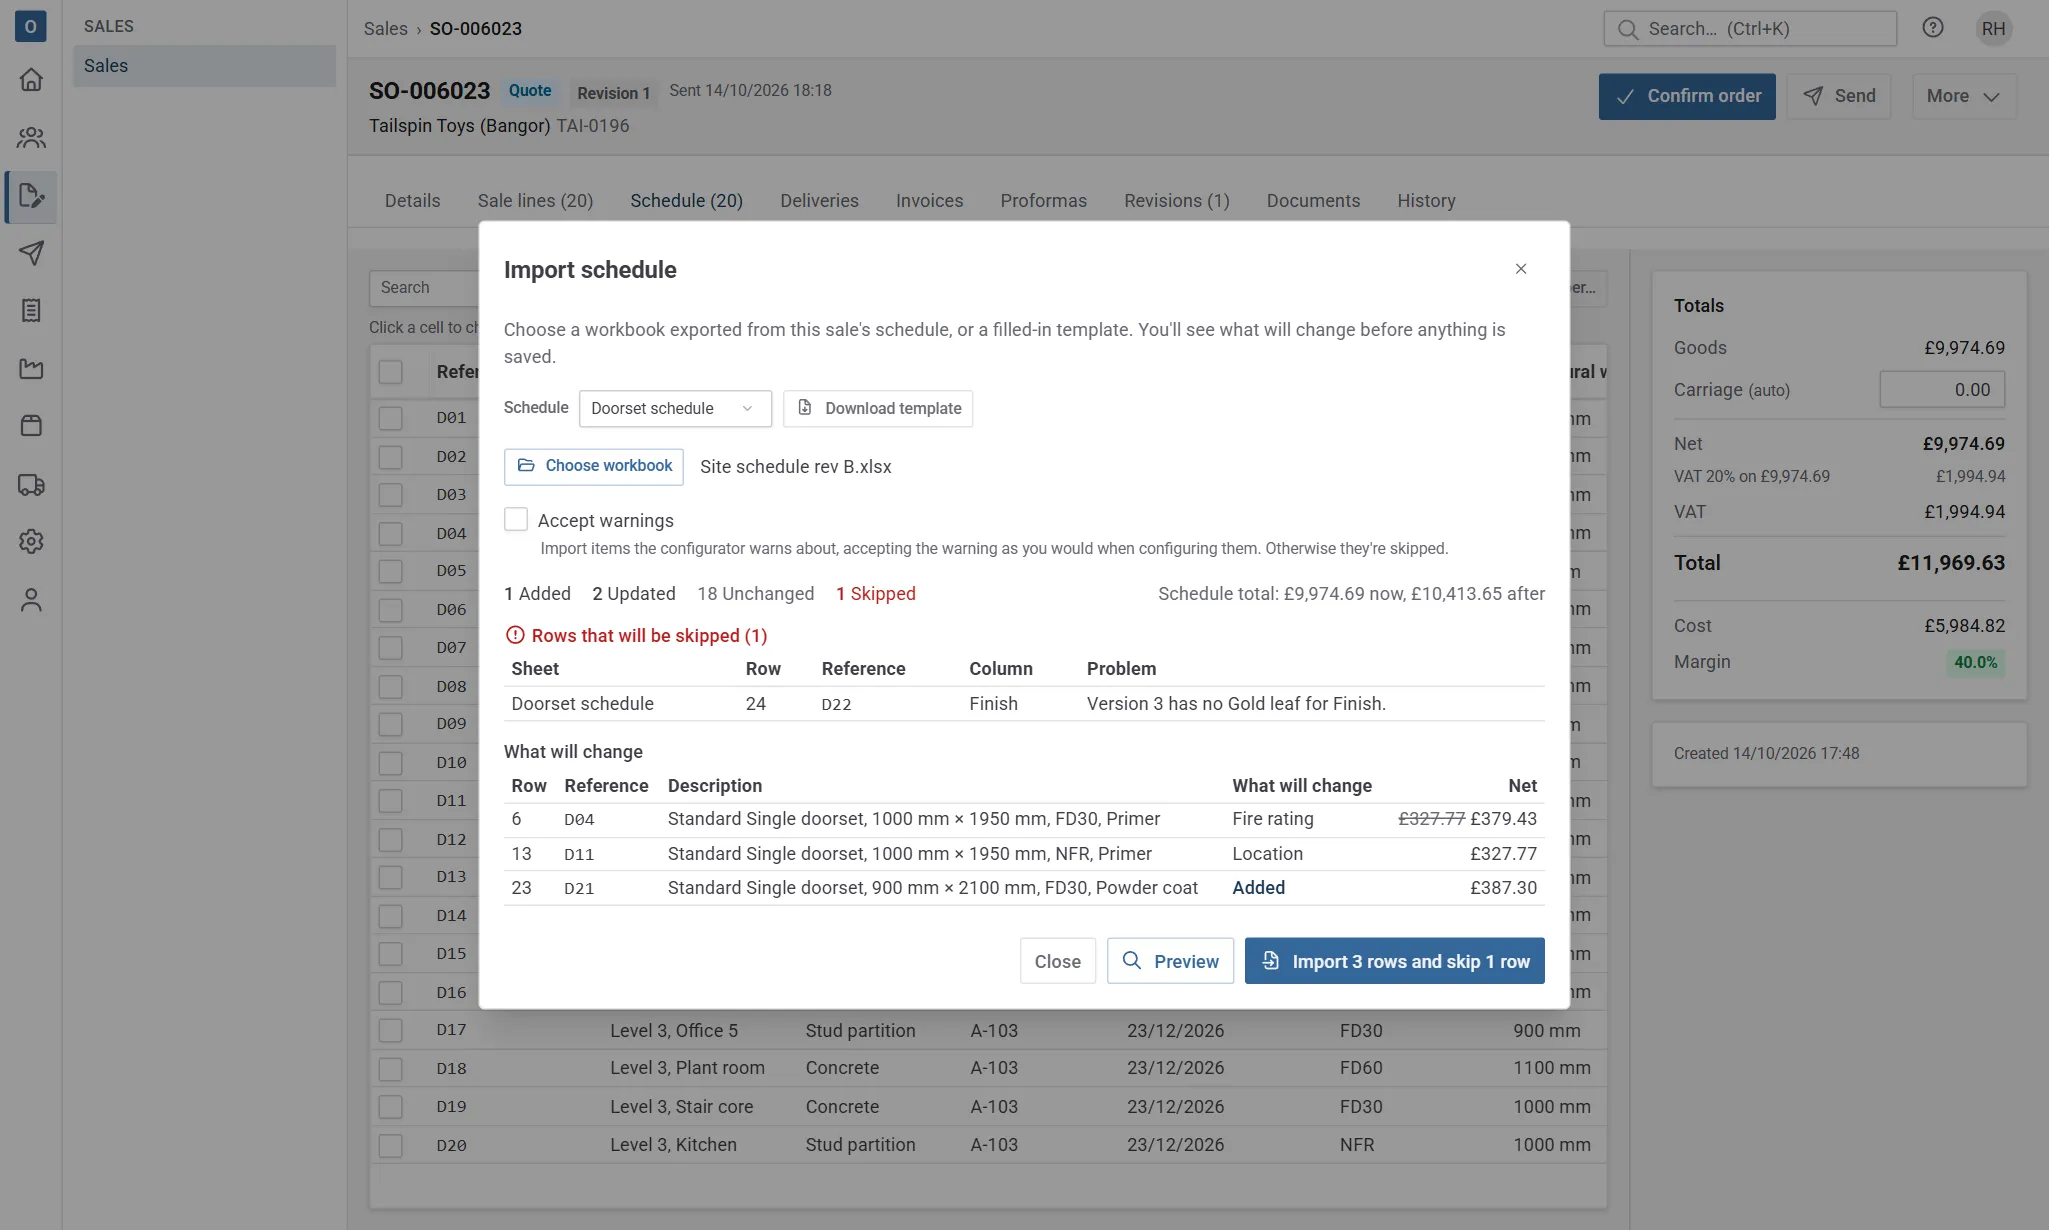
- Select Spreadsheet and choose Import…. To fill in a list from scratch (a customer’s list, say), choose the schedule (the sub-tab’s to begin with) and select Download template for a workbook with just the headings. One import reads every sheet in the workbook, whichever sub-tab you open it from.
- Select Choose workbook, then Preview. Nothing is saved yet. The preview shows how many items will be added, updated, left unchanged and skipped; the schedule’s total now and after; each row that will be skipped, with its sheet, row, reference, column and what’s wrong; and what will change on each item.
- Select Import (it says how many rows go in and how many are skipped, such as Import 46 rows and skip 3 rows). The rows that passed are saved together, as if you’d changed them and selected Save: items whose answers change are worked out again at today’s prices; typed prices stay; quantity and field changes keep the unit price. Minimum margins and locks are checked in the preview, as the save checks them, so a row that would go under its minimum margin is skipped there. The rows that were skipped are left as they are, for you to fix in the file and import again.
If the sale or the file changed after the preview (someone else saved the sale, say), nothing is imported and you’re asked to preview again.
How the rows are read:
- Matching: a row with an Item ID updates that item, and a reference typed on it renames the item (as long as no other item has it). A row without one updates the item with its reference. Any other row adds an item at the end of the sale; one with no reference gets the next free reference if your company numbers items, never one that another row in the file uses.
- Answers: an updated item keeps its answers and its version, and each cell that differs from what it has now is answered as if you’d chosen it in Edit configuration. A new item starts from scratch on the product’s current version. Give choices by their name (as the export writes them), or else their code or key. Text that could be two values is skipped, naming both: give the name instead.
- Blank cells leave things as they are. An import can’t clear an answer or a field: do that in the grid or the configuration.
- Sheets: each sheet is matched to a schedule by its name, or else by the product codes and references on it. If its name is both a schedule’s and a family’s on another schedule, its rows decide which it is. An item on another schedule’s sheet is skipped, naming its schedule. A reference used on two rows skips both.
- Families: a row’s family is its item’s, or for a new row its product code’s. Its attribute cells are read in its own family: each column means the attribute the export put under it for that family, whatever its heading says now. The workbook keeps this in a hidden sheet, so if an attribute is renamed after the export, its column is still read as exported, and the preview says so. A column typed in yourself, or from an older file, is matched by its heading (the column’s name, then a family’s attribute) or its key. A filled cell under an attribute the row’s family doesn’t have skips the row (“Server builds have no Fire rating.”); a blank one is fine.
- Fields: only the schedule’s own fields are read. A column for another field is left out and listed under the preview.
- Products: a new row needs a product code from one of the schedule’s families. An item’s product can’t change by import: remove it and add a new one.
- Numbering: a new row with no reference gets the next free reference from its sheet’s schedule, after every reference on the sale and in the file.
- Older files: a workbook exported before schedules had a sheet each still imports. Its sheets are named after product families, and each is read as its family, on that family’s schedule. A sheet for a family that isn’t on any schedule is skipped, saying so. A workbook exported before Location became a schedule field also still imports: its Location column goes into the Location field.
- Warnings: an item the configurator warns about is skipped, unless you tick Accept warnings before previewing, which accepts them as you would when configuring the item.
- Items on a document: an item on a delivery, invoice, proforma, purchase order or requisition is skipped if its answers would change, naming the document. Its fields and quantity can still change, but the quantity can’t go below what’s been delivered or invoiced.
- Limits: an Excel workbook (.xlsx) of up to 5 MB, 1,000 items and 500 columns a sheet (an export that would need more is refused). Formulas are never worked out: a cell’s saved value is used, and a formula Excel hasn’t saved a value for is a problem. Family, Description, Unit price and Net are ignored.
Print the schedule
Section titled “Print the schedule”On quotes and acknowledgements
Section titled “On quotes and acknowledgements”Quotations and order acknowledgements print a schedule of the configured items after the totals:
- A table for each family, headed by the family’s name, so each family has its own columns.
- A part for each schedule, when the sale has items on more than one: the schedules come in the order of your schedules, and each table is headed by its schedule’s name, such as Unit schedule, or Unit schedule: Steel units when that schedule has more than one family on the sale. Each schedule prints its own fields and its own price and description choices. With Start it on a new page on, each schedule starts a new page.
- The columns: the reference, the schedule fields that are Printed on the item’s schedule, in the schedule’s order (such as the location), the family’s schedule columns, the quantity, and the unit price and net. A column no item in the table has a value for is left out.
- The description prints for families with no schedule columns. The template can print it always or never.
- Costs and margins never print.
It’s only printed when at least one item has a reference, a printed field or a value in a schedule column, so sales that don’t use schedules print as before. With more than one schedule, this is decided for each schedule. Items whose family isn’t on a schedule never print here. By default it starts on landscape pages, and anything after it (notes, terms and the closing) carries on upright. Every page keeps your branding, and the table headings repeat on each page. An administrator can change this, or switch the schedule off, in Administration → Document templates. See The schedule.
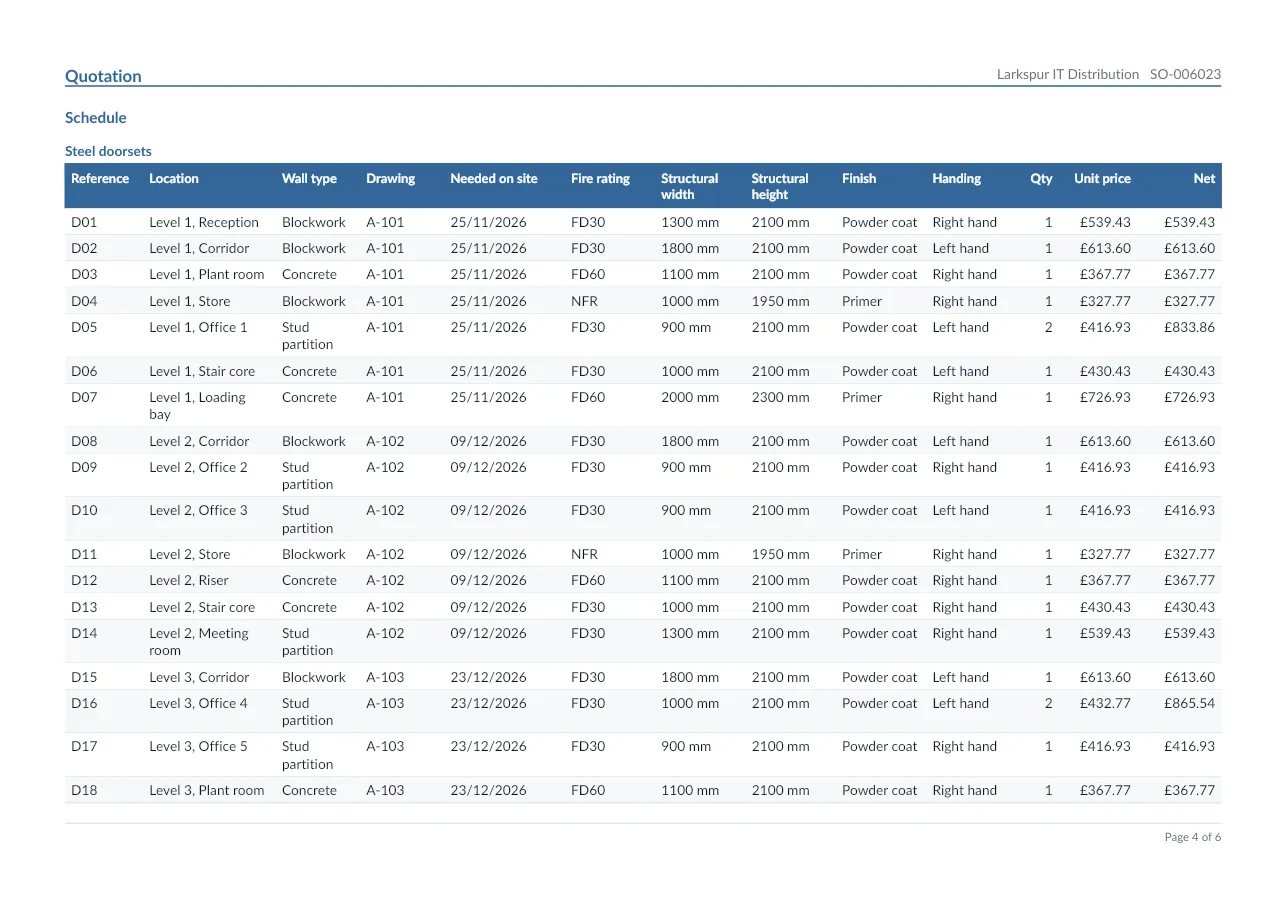
A sent document keeps the references and field values it was sent with, even if they change later. Column choices and field names follow the current settings.
On its own
Section titled “On its own”On the sale, select Send → Print schedule to download the schedule as a PDF: the sale’s heading (customer, our reference, their order number and when it was printed) and the same tables, with your branding, on landscape pages unless the template says otherwise. When the sale has items on more than one schedule, Print schedule offers All schedules and then each schedule by name: one schedule prints only its items, with its name in the heading. It prints what’s saved, so if you have unsaved changes you’re asked to save first. It isn’t kept with the sale’s documents or emailed: print it whenever you need a current copy.
References also print on To make and, for made parts, on the pick list.
From the Schedule tab
Section titled “From the Schedule tab”Print schedule on the Schedule tab prints the items the grid shows: the ticked ones if you’ve ticked any, otherwise every item the search and filters leave, with the filter named in the heading. With more than one schedule it prints only the grid’s own schedule, named in the heading. It prints what’s saved, so if you have unsaved changes you’re asked to save first.
On a phone
Section titled “On a phone”On a phone the schedule is a list of cards, one per item, with its reference, its schedule field values (such as the location), description, quantity, price and lock. With more than one schedule, each has its own section, headed by its name. You can search and group, but not change anything: use a larger screen to edit the schedule.
Many lines on the Sale lines tab
Section titled “Many lines on the Sale lines tab”A configured item brings its parts with it, so a sale with many items has a lot of lines. When a sale has more than 50 lines (not counting parts), the Sale lines tab shows them 50 at a time; each item’s parts stay with it on its page.